- Installing OpenFOAM-dev
|
|
sudo add-apt-repository "http://dl.openfoam.org/ubuntu dev" sudo sh -c "wget -O - http://dl.openfoam.org/gpg.key | apt-key add -" sudo apt-get update sudo apt-get install openfoam-dev |
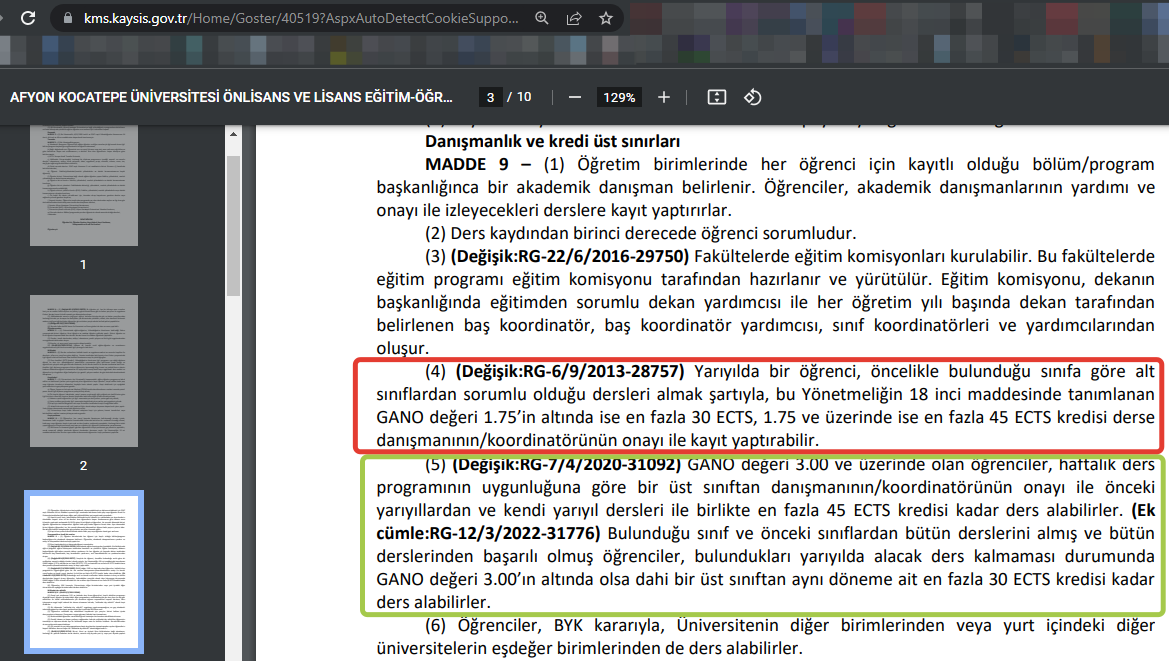
User Configuration
In order to use the installed OpenFOAM package, the user needs to set their environment for OpenFOAM as follows.
- One Time Only: At the bottom of the user’s
.bashrc file, source the bashrc file in the OpenFOAM installation which contains the environment settings. For openfoam4, the following command avoids the need to open an editor (for OpenFOAM-dev, replace openfoam4 with openfoam-dev):
|
|
echo "source /opt/openfoam4/etc/bashrc" >> .bashrc |
- One Time Only: register the change to the
.bashrc file by typing at the terminal prompt (note the dots):
- Test that the
simpleFoam application, from the OpenFOAM package, is working by typing
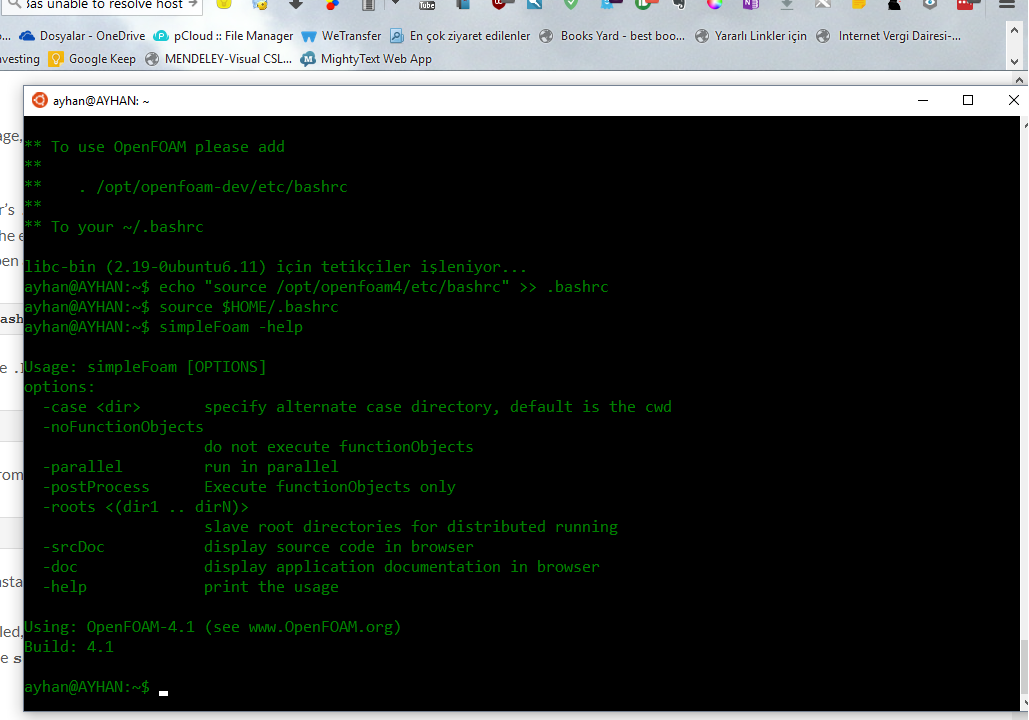
- A “Usage” message should appear. Your installation and user configuration is complete.
If more than one OpenFOAM package is installed, e.g. both openfoam4 and openfoam-dev, the user’s .bashrc file should contain only the source... command for the version they currently wish to use.
Enabling Graphical Applications
To run graphical Linux applications, such as ParaView or the gedit editor, requires the installation of X server software. The most popular X server software for Windows is Xming, which can be installed as follows:
- Download the Xming installer.
- Run the Xming installer using the default settings.
- Launch Xming and it runs in the background, visible in the system tray, waiting for a graphical Linux application to be launched.
When a bash shell is opened, the DISPLAY environment variable needs to point to the X server that is running. To make this addition permanent, set the DISPLAY in the user’s .bashrc file and source it again, i.e. execute one time only:
|
|
echo "export DISPLAY=:0" >> .bashrc source $HOME/.bashrc |
With graphics enabled, users may wish to install other useful supporting graphical applications for OpenFOAM, such as the gedit file editor, the GnuPlot graph drawing package, and mplayer video player (and mencoder encoder) software, e.g.
|
|
sudo apt-get install gedit gedit-plugins sudo apt-get install gnuplot gnuplot-x11 gnuplot-doc libgd-tools sudo apt-get install mplayer mencoder |
Next Steps
See OpenFOAM 4.1 on Ubuntu: Getting Started. If the user has enabled graphical applications, they can open the gedit editor in the background (&) with
Otherwise without graphical support, 3 popular editors which can work through a terminal are:
nano: the easiest of the 3 editors for the purpose, see nano basics guide;emacs: powerful editor that uses a more complex set of key commands, emacs basics;vim: another editor with arguably a less familiar set of key commands, see vim quick guide.
It is worth knowing the command to exit the editor you use in case a problem arises:
nano exits with C-x (C=Control key)emacs exits with C-x C-c (preceded by C-g, if needed)vim exits with ESC :q!
Thanks to Dongyue Li (from the Contributors to OpenFOAM) for testing and reporting his experience with OpenFOAM using Bash on Ubuntu on Windows 10.